Sunday, May 29, 2016

A Big (Belated) Bovine Birthday Wish | Mama Elephant Lunar Animals

Hi everyone,

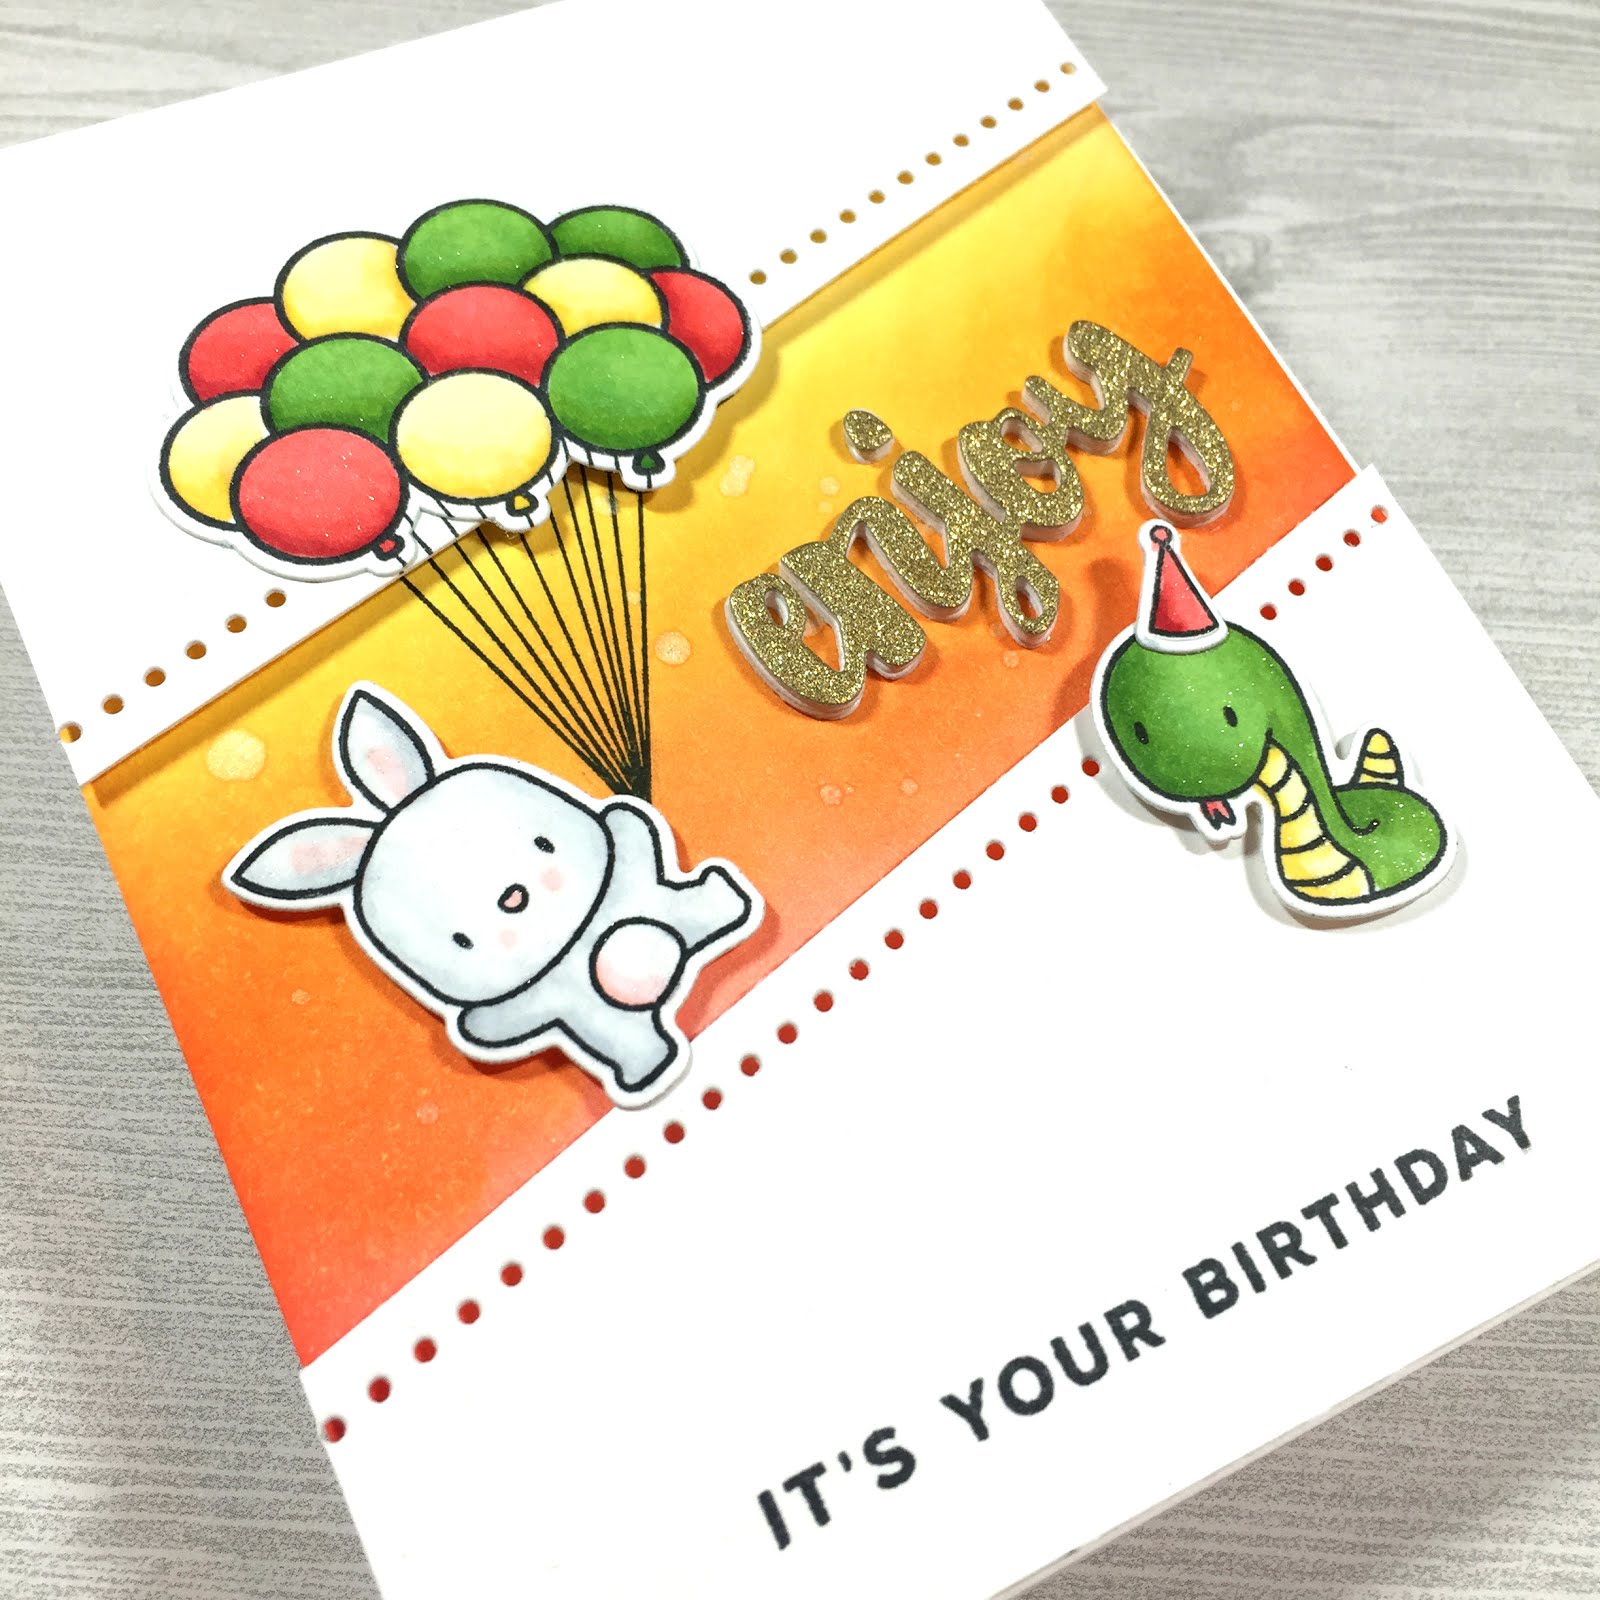
I'm here with another birthday card tutorial. I made this card for my eldest uncle on my mom's side of the family. My uncle was also born in the year of the bull/cow, so I'm using the awesome Lunar Animals stamps from Mama Elephant to make this birthday card.  While my uncle has a very healthy appetite (he especially loves seafood and soup), he is also very healthy.  He can do all these crazy difficult yoga poses that I can only dream of doing.  Haha.  He spends half the year on the East Coast, so I thought the sentiment from Mama Elephant's Up and Away stamp set was also perfect for this card.


Materials:
  • Mama Elephant: Lunar Animals Stamps and dies
  • Mama Elephant: Up and Away stamps
  • Mama Elephant: Reindeer Games stamps and dies
  • Mama Elephant: Ella and Friends stamps and dies
  • Spellbinders: A2 Matting Basics
  • Sizzix: Circle Framelits
  • Mama Elephant: Sew Fancy dies
  • Mama Elephant: Picket Fence die
  • Distress Ink: tumbled glass
  • Copic Markers:
    • C00, C1, C3, C5, C7
    • R20, R22, R24
    • Y00, Y08
  • Ranger Liquid Platinum Embossing Powder
  • Martha Stewart Heat Tool
  • Versamark Ink
  • Memento Tuxedo Black Ink
  • Foam Adhesive
  • Glue Pen
  • Adhesive Tape Runner
Directions on YouTube:
Click the image to watch a video of this card!

Directions - Step By Step:
  • Stamp the cow, bunny, gifts and party hats with Memento Tuxedo Black Ink and color with Copic Markers. Die cut all the pieces.
  • Die cut the cross stitched card front twice.  In one insert, die cut the Sizzix circles in the lower right corner to create a window.  Stamp the sentiment and heat emboss using embossing powder.
  • In the second insert, cover the cross stitch edge border with washi tape and ink blend a sky background using tumbled glass distress ink.  
  • Die cut the picket fence from white and green card stock.  The green will server as the grassy bottom layer.
  • Assemble the card according to the image above. Move from the back to the front, so start with the grass, then the cow w/hat, then the fence and finally the bunny and gifts.
  • Using foam adhesive, layer the "sending smiles" front on top of the card.
  • Enjoy!

Happy Happy Birthday, Da Jiu Jiu!


Thursday, May 19, 2016

A Scenic Birthday Card featuring Mama Elephant and Lawn Fawn

Hi everyone,

Today's card is a special birthday card for my Uncle John.  Uncle John and I-E-Lu (my aunt) love to travel all over the world.  From Antarctica to Greenland, all over Europe and Asia, down to Australia and all over North and South America, they have seen it all, well almost... there are still many adventures in store for them.  So, I thought it would be fitting to create this scenic card for Uncle John's birthday.  He was also born in the Year of the Dog and really enjoys all kinds of food: sweet, savory, unique, tasty, good-value + great taste is the best.  A few years ago, when the Cronut trend hit the marketplace, Uncle John was the first to tell me about it.  Hmm... wonder what other food trends are on the horizon?

Happy Birthday, Uncle John!  This card is for you:


Materials:
  • Mama Elephant: Playful Pups stamps and dies
  • Mama Elephant: Ella & Friends stamps and dies
  • Lawn Fawn: Baked with Love stamps and dies
  • Mama Elephant: Snow Capped Mountains die
  • Lawn Fawn: Forest Border die
  • Lawn Fawn: Stitched Hillside Borders dies
  • Lawn Fawn: Scalloped Rectangle Stackables dies
  • Simon Says Stamp: Stitched Rectangle dies
  • Doodlebug Design: Sunkissed Green Grass Patterned Paper
  • Distress Inks:
    • Tumbled Glass (Sky)
    • Iced Spruce (Mountains)
    • Pine Needles (Forest)
    • Peeled Pain (Middle Hill)
    • Mowed Lawn (Front Hill)
  • Copic Markers
  • Memento Tuxedo Black Ink
  • Foam Adhesive
  • Adhesive Tape Runner
  • Wink of Stella Clear Brush Pen

Directions:

  • Please click here to watch my video on YouTube to see how I made this card or click the image below:
Click the image above to watch the video on YouTube


Happy Birthday, Uncle John!

Love,
Christina

Saturday, May 14, 2016

A Whale-y Fun Card featuring Lawn Fawn and Echo Park Paper Co.

Hi everyone!

Happy Saturday!  Hope your weekend is off to a great start.  My card today is for my good friend's six year old son who loves whales!  They came to visit Southern California and had a "whale-y" fun time whale watching.  He also happens to be my youngest YouTube viewer, so the video I posted on my YouTube channel incorporates his feedback.  I used the "Whale You Be Mine" stamp set from Lawn Fawn and paired it with some fun Echo Park Paper Co. patterned paper.


Materials:
  • Lawn Fawn: Whale You Be Mine stamps and coordinating dies
  • Lawn Fawn: Scripty Sayings
  • Echo Park Paper Co: Pirate's Life, Creative Agenda, Dots & Stripes paper
  • Simon Says Stamp: Stitched Rectangles, Stitched Shapes, Stitched Circles
  • Taylored Expressions: Rolling Clouds
  • Quicklets Eyelets in Red
  • Rope
  • Memento Tuxedo Black Ink
  • Copic Markers: W00, W2, W4, R20, R22, R24, BG10
  • Distress Inks: Mermaid Lagoon, Salty Ocean
  • Foam Adhesive, Adhesive Tape Runner, Glue Pen

Directions - Video Tutorial:

  • Please watch my YouTube video (click here) for a full start-to-finish "how-to" video of this card. You can also click the image below.
Click here to watch me make this card on YouTube

Directions - Quick Highlights:
  • Stamp the images on copic-friendly card stock, color with Copic markers and die cut with coordinating dies
  • Die cut a stitched rectangle from the blue stripe and woodgrain patterned paper and white card stock.  Use the stitched edge to cut a diagonal.  Line it up with the blue diagonal to get a perfect cut.
  • Die cut a porthole window frame using the two largest stitched circles from four pieces of white card stock and the red polka dot paper.
  • Die cut a circle for the background of the porthole window
  • Using Distress Inks, ink up a scrap piece of card stock for the ocean and die cut using the circle and rolling cloud dies.
  • Assemble the window.
  • Punch six holes across the top of the woodgrain paper.  Insert the quicklets into each hole and set it with a ballpoint pen.  String some rope through the holes and finish the edges with knots.
  • Glue all the pieces to the card insert.  Then use foam adhesive to prop it up on the card base.
  • Stamp the sentiment in the inside of the card.
Here's a close-up of the card.


Have a whale-y great weekend!


Tuesday, May 10, 2016

A Birthday Shaker Card | Happy Birthday, Teresa!

Greetings everyone,

Today I'm sharing a fun birthday shaker card that I made for my college roommate, Teresa. Before I left for college, my brother told me one of his friends had a little sister who was starting at MIT too and maybe we'd meet.  I remember thinking "sure -- the school is so big, it's doubtful I'll randomly bump into this person."

Fast forward to Day 1.  Back then, MIT randomly assigned you to temp housing.  You stay in these temp dorm rooms for a week or so before "matching" with your preferred dorm or sorority/fraternity. My temp room was right next door to Teresa's, but at the time I had no idea she was my brother's friend's little sister. We met and went through orientation week together. One day, while sitting in Killian Court, the large spacious lawn in front of MIT's Great Dome, we were eating free popsicles with cheesy jokes on them (it was super hot and humid).  We started to share more about our backgrounds.  I mentioned I had an older brother who just graduated from Harvard.  And she said, "Oh, my sister is a senior at Harvard..." and then we paused, looked at each other and suddenly the light bulbs went off in our heads. We simultaneously screamed "Oh! You're the one my [brother | sister] mentioned!"

Years later, we separately found our way to Los Angeles and reconnected.  Now I have a great friend and crafting buddy close by!  Teresa is sooo supportive of Bubblegum Paper.  In fact, she was my very first YouTube subscriber!  Happy Birthday, Teresa.  This card is for you:

Materials:
  • Simon Says Stamp: Happy Birthday Circle die
  • Simon Says Stamp: Hello, Beautiful stamps
  • Simon Says Stamp: Stitched Rectangles
  • Simon Says Stamp: Stitched Circles
  • Lawn Fawn: Home Sweet Home stamps and dies
  • Lawn Fawn: Chit Chat stamps and dies
  • Lawn Fawn: Perfectly Plaid paper
  • White card base: 4.25"W x 11"H, scored at 5.5" mark
  • White card stock
  • Aqua card stock
  • Clear acetate sheet
  • Memento Tuxedo Black Ink
  • Copic Markers
  • Sizzix Adhesive Sheet
  • Taylored Expressions: Metal Shim
  • Taylored Expressions: Rainbow Brights sequins
  • Wink of Stella Glitter Pen
  • Foam Adhesive
  • Adhesive Tape Runner

Directions via YouTube:

  • Click here to watch me make the card on YouTube:

Click the image above to watch the video on YouTube
Directions - Step by Step:
  • Stamps the birds, banner and sentiment on copic-friendly card stock.  I'm using Neenah Classic Crest Solar White 110lb card stock. Color with copic markers.
  • Die cut a window from some white card stock using the stitched rectangle and stitched circle dies.
  • Die cut the Happy Birthday Circle from both white and aqua card stock.  To make it easier to glue this on the acetate sheet, apply a Sizzix adhesive sheet to the back of the card stock before die cutting.  It's a great way to get instant stickers!
  • Glue the acetate to the back of the window.  Add foam adhesive around the window and the edges of the back of the front panel.  Fill with sequins.
  • Attached the perfectly plaid paper to the card base and carefully adhere the card base to the front panel. Be careful not to spill the sequins!
  • Attach the Happy Birthday die cuts to the front window.  I layered a white one on top of the aqua one.
  • Add the banners and birds as the finishing touch!
Happy Birthday, Teresa!


Sunday, May 8, 2016

Lights, Cards, Action... Happy Mother's Day!

Hi everyone,

Happy Mother's Day to all you moms out there, especially my mom and my aunts who treat me like their very own daughter.  I have a very special card to share with you. This card features Chibitronics circuit stickers.  You know how much I love making projects with these stickers and I felt Mother's Day was a perfect occasion to use them.  After all, mothers everywhere are brightening up and sparking creativity in their children every day, right?

Here's the card with the lights off and on.  Aren't these Chirpy Chirp Chirp stamps from Lawn Fawn the cutest?  I love their flower border die cuts too!


Materials:


Directions via YouTube:

I'll be honest, the best way to see how this card was made is the watch the YouTube video (click here) because there were so many steps... and of course, I forgot to take step by step photos as I was making the card.  Oops!

Click the image to watch the video on YouTube


Directions - Condensed Step by Step:


  • Stamp the chicks, paint bucket, paint brush and butterfly with Memento ink and color with copic markers.  Use the coordinating die cuts to cut everything out.
  • Die cut the flower border from yellow, pink and green patterned paper.  The green patterned paper should have approx 1.5-2" of space below the higher hillside curve.  We are only using the flower tops from the pink and yellow paper, so it doesn't matter how much space you leave below the border.
  • Die cut a scalloped rectangular frame using the second largest scalloped rectangle and the second largest stitched rectangle.
  • Add distress ink to a card insert to create a subtle sky.
  • Glue the green flower border.  Add the pink tulips and yellow daisy tops to the border.
  • Stamp the sentiment in green ink to the bottom of the green hill.
  • Take a 1/8 inch hole punch and punch out the centers of the yellow flowers.
  • Mark these holes on your card base. This is where the lights will go.
  • Take a piece of cardstock 1"x2" and folder in half to create a battery holder.  Mark one side "+" and the other "-"
  • Run copper tape above and below the circles you drew on the card base.  One piece of tape should run to the negative side of a battery holder.  The other should run to the positive side of the battery holder.
  • Place the LED circuit stickers on top of the tape and center over your pencil mark dots.  Make sure all the negative (pointy) sides are touching the same piece of tape and all the positive (flat) sides are touching the same piece of tape, but different from the negative piece of tape.
  • Cradle the battery using foam adhesive.
  • Place foam adhesive around the enter border of the card.
  • Add the floral front.
  • Finish the card by adding the scalloped frame, chicks, paint brush, paint can and butterfly.
  • Tip: if you want to turn off the card so the battery doesn't run out, just insert a piece of cardstock or paper between the battery and the copper tape.  You can write "pull" on the paper and your recipient can just pull that out to light up the card.
Okay, that's a lot of words, so again, the best way to see how I made this card is to watch my YouTube video for this card.  And while you're there, please considering subscribing to my Bubblegum Paper YouTube channel!  Thank you so much!

Happy Mother's Day!

Saturday, May 7, 2016

A Washi Tape Birthday Card | Happy National Scrapbook Day

Hi everyone,

Today is my friend Jen's birthday... I call her Chu.  Chu and I met when I was 8 years old. We grew up in a small town in New England.  A few of my friends refer to it as a real-life "Stars Hollow" (a la Gilmore Girls). Now, decades later, we both live in Los Angeles.

Chu is a major pet lover.  She's always had pets for as long as I can remember.  It started with a cat here or there and then a few years ago she added a little puppy to her menagerie. I, on the other hand, am petrified of any furry animals.  Well, animals or any non-human/non-plant living things. However, I am not afraid of cartoon animals (Garfield, My Little Pony, Mickey Mouse) or plush stuffed animals (Mickey, Snoopy) or cute stamp sets!  So... my card today features a little puppy and some happy cute products from Doodlebug Design.


Today is also National Scrapbook Day!  There are so many fun events and challenges happening in honor of National Scrapbook Day.  I entered this card into the Scrapbook.com / Doodlebug Design Washi Challenge.  Check out the other fun stuff they have going on at Scrapbook.com today (including 10% off and a free stamp set with purchase).

Materials:

  • Pink card stock
  • White card stock
  • Doodlebug Design: Under the Sea patterned paper
  • Doodlebug Design: Candy Stripes washi tape
  • Taylored Expressions: Up, Up and Away cutting plate
  • Mama Elephant: Playful Pups stamps and dies
  • Lawn Fawn: Scalloped Rectangle Stackables
  • Copic Markers
  • Memento Tuxedo Black Ink
  • Foam Adhesive
  • Adhesive Tape Runner

Directions via YouTube:

  • You can watch me make this card on my YouTube channel (click here).  I am trying to post more card making process videos, so please subscribe to my channel if you want to see more projects!


Directions:
  • To make your card base, start with a piece of 4.25"W x 11"H pink card stock and fold at the 5.5" mark.
  • Die cut the inside of the card using the scalloped rectangle die and stamp "Yappy Birthday" inside.
  • Stamp the puppy with Memento Tuxedo Black Ink on scrap card stock and color with Copic markers. Die cut the puppy using the coordinating dies.
  • Layer pieces of washi tape on white card stock to form a diagonal striped pattern.  I used pink, orange, green, blue and purple tape for this. Use the Taylored Expressions dies to cut out the balloons.
  • Die cut the full cutting plate from both the patterned paper and white card stock.
  • Layer everything together and use foam adhesive to pop the pink balloon and frame from the card base.  Attach the puppy to the lower corner using foam adhesive.  
Here's a close-up of the card:


Happy Birthday, Chu!


Tuesday, May 3, 2016

Birthday Gift Card - Happy Birthday, Jeremy!

It's my nephew's birthday today. I can't believe he's already 15 years old. What a way to make me feel old.  I still remember the day he came home from the hospital.  I had never seen a newborn baby before that -- or at least not that "new" -- he was so tiny!  Healthy weight, but so tiny. For some reason, my idea of a newborn baby was the Michelin tire baby or the baby pictured on Gerber food jars.  Haha -- shows how much I know! Now my nephew is 6'1" and growing!

What kind of gift do you give a fifteen year old who is your source for the latest trends?  He keeps me posted on the latest social media tactics, tells me fun brands to follow, etc... (in fact, my niece and nephew are the ones who introduced me to the power of YouTube!)

There's nothing trendy enough that I'd be able to find... so I resorted to a gift card from his favorite store.  And, at least I can make a fun card! Although he may prefer the gift card over the handmade one. ;-)


Materials:

  • Card base: 4.25"W x 11"H, scored at 5.5" mark
  • Glitter Cardstock
  • Mama Elephant: Lunar Animals stamps and dies
  • Mama Elephant: Up and Away stamps and dies
  • Mama Elephant: Fine Trimmings dies
  • Simon Says Stamp: Painted Enjoy die
  • Simon Says Stamp: Big Birthday Wishes stamp set
  • The Stamps of Life: Gift Card Envelope Die
  • Distress Ink:
    • Squeezed Lemonade
    • Spiced Marmalade
    • Abandoned Coral
  • Heidi Swap Color Shine in Sheer
  • Memento Tuxedo Black Ink
  • Copic Markers
    • 0, C00, C0, C1, R20
    • R22, R24, R29
    • YG13, YG25, YG17
    • YG0000, Y21, Y15
  • Adhesive Tape Runner
  • Foam Adhesive

Directions on YouTube:

  • You can watch me create this card from start to finish on my YouTube Channel.  Click here to watch the video on YouTube, if the embedded video doesn't play below.


Directions:

  • Stamp all the images using Memento Tuxedo Black Ink and color with Copic markers.
  • Die cut all the images using their coordinating dies.
  • Die cut four "enjoy" dies from white card stock and one from glitter paper.  Glue all the layers together.
  • For the front panel, cut a diagonal line about 1/3 of the way from the top and bottom.  These panels (Trapezoids!) will serve as a frame over the background.  Use the Fine Trimmings to add a decorative edge.
  • Using distress inks, ink blend a background on a card panel
  • Stamp the sentiment on the bottom panel.
  • Using foam adhesive, attach the top and bottom trapezoids and glue the rest of the pieces in place.

Here's a close-up shot of what the card looks like.  Enjoy!


Happy Birthday, Jeremy!

Love, Gu Gu

Sunday, May 1, 2016

The 12 Months of Christmas Link Up: New Challenge #17 - Non-Traditional Xmas Colors

Happy May Day!  Are the April showers disappearing yet?

Welcome to the 12 Months of Christmas Link Up Design Challenge.  This month we're featuring some really fun digi stamps by The Stamping Boutique and Glitterbabe.

Here are the challenge details:
  • Blog link: The 12 Months of Christmas Link Up 
  • Challenge dates: May 1-31, 2016
  • Optional theme: "Non-Traditional Christmas Colors" - if you would like to participate in the optional theme for the month, create a card that features a non-traditional Christmas palette. Also add "FT" after your name, so we can include it in the prize drawing. This theme is optional.  You only need to follow the theme if you are interested in winning a the prize from The Stamping Boutique (free digi stamps).
  • As always: All card submissions (with or without optional theme) will be eligible to earn a free paper each month and some extra digital goodies.
  • Guest Sponsor: The Stamping Boutique and Glitterbabe (see info below).
  • Additional Sponsor: Décosse's Dynamite Doodles
  • Prize Info: 
    • From The Stamping Boutique and Glitterbabe: Two free digi stamps (or three stamps if you use one of their designs) for one random winner chosen from those who participate in the optional theme.
    • From Décosse's Dynamite Doodles: 
      • Prize 1: one free digital paper to EVERYONE who links up a minimum of two cards. The theme for these cards is optional.
For some inspiration, here is the card I designed using the Natalie stamp and details on how I made the card.


Materials:
  • The Stamping Boutique: Natalie stamp
  • White card stock for card base: 5.5"W x 8.5"H, scored at 4.25" mark
  • Bokeh patterned paper from Décosse's Dynamite Doodles
  • Lawn Fawn Scalloped Rectangle Stackable Dies
  • Simon Says Stamp Stitched Rectangle Dies
  • Primacolor Premier Colored Pencils
  • Gamsol
  • Blending stumps
  • Adhesive Tape Runner and Foam Adhesive
  • Wink of Stella clear brush pen
  • Heidi Swap Sheer Color Mist
Directions:
  • Size the image of the Natalie stamp (for my card I used 25%) and print on card stock
  • Color the image using colored pencils and blend with Gamsol
  • Add sparkle to the ornaments using Wink of Stella
  • Die cut the patterned paper using the stitched rectangles
  • Die cut the scalloped rectangles one size larger than the stitched rectangles
  • Adhere the layers together.
  • Splatter some color mist on the front for more sparkle

SPONSOR INFO:

http://thestampingboutique.com/http://thestampingboutique.com


As I mentioned above, this month's challenge is brought to you by our Guest Sponsor, The Stamping Boutique and Glitterbabe.

Our additional sponsor is Décosse's Dynamite Doodles.

http://decossesdynamitedoodles.blogspot.ca/

Now it's your turn!  Create a holiday card and be sure to add it to the 12 Months of Christmas Link Up Challenge blog!  Look forward to seeing your amazing designs!

Happy Card Making!