Wednesday, March 30, 2016

Collab: Chibitronics and Lawn Fawn - Well Done!

Hi everyone,

I am super duper excited to be joining this awesome collaboration with two of my favorite crafty brands: Chibitronics and Lawn Fawn! If you've been reading my blog for a while, you've probably seen me post many projects featuring both products.  I create things with these products on a regular basis.

Here are two projects that I made featuring Lawn Fawn's Let's BBQ stamp set along with Chibitronics Light Stickers.  My friend, Patricia, who runs Chibitronics LOVES to eat... so I made this card for her!


Materials:

  • Chibitronics Starter Kit
  • Lawn Fawn: Let's BBQ stamp set
  • Lawn Fawn: Scalloped Rectangle Stackables die 
  • Lawn Fawn: Grassy Border die
  • Lawn Fawn: Let's Bokeh In the Snow Patterned Paper
  • Simon Says Stamp: Stitched Rectangles Die
  • Distress Ink: Tumbled Glass
  • Copic Markers
    • Grill: C3, C5, C7, C9
    • Burger Patty: E55, E57
    • Burger Bun: E53, E55
    • Lettuce, Ketchup, Cheese: YG07, YG13, R22, R24, Y21, Y35
  • Versamark Ink
  • White Embossing Powder
Directions:
  • For the card: 
    • Stamp the grill, patty and burger images on Copic-friendly cardstock.  Color with Copic Markers and fussy cut.
    • Cut two shades of green cardstock from the grassy borders dies. Offset one on top of the other.
    • Using the Tumbled Glass distress ink, color a blue cloudy sky on some white cardstock
    • Layer the Grass and sky together and die cut the whole piece using the stitched rectangle dies
    • Also cut a piece of the red striped patterned paper from the stitched rectangle die.  Then go back and use the scalloped rectangle die to cut the edge forming an awning.
    • Using Versamark Ink, emboss the "Well Done!" sentiment on the awning using white embossing powder.
  • For the lights:
    • Punch two holes on either side of the burger patty on the grill.
    • Mark these holes in each layer leading to the card base
    • On the card base, line up the lights so they match the holes and create a parallel circuit using two red stickers.  This is what the circuit looks like (pardon, the ripped, paper... I forgot to take a photo while making the card, so I went back and removed the front to take this photo)
  • Using foam adhesive, prop up the card front.
  • And there you have it!

Check out all the exciting projects that the Design Team members made over at the Lawn Fawn blog and the Chibitronics blog.

Okay, who's hungry now????

Enjoy!
Christina

Tuesday, March 15, 2016

The 12 Months of Christmas Link Up: New Challenge #15 - Holiday Decorations

Beware the Ides of March -- or Happy Belated Pi Day -- or Happy early St. Patrick's Day.

In any event, I am here with another 12 Months of Christmas Link Up Design Challenge.  This month we're featuring some really fun digi stamps by A Day for Daisies.

Here are the challenge details:
  • Blog link: The 12 Months of Christmas Link Up 
  • Challenge dates: March 1-31, 2016
  • Optional theme: "Holiday Decorations" - if you would like to participate in the optional theme for the month, create a card that showcases a holiday decoration on it (lights, wreaths, ornaments, tinsel...). Also add "FT" after your name, so we can include it in the prize drawing. This theme is optional.  You only need to follow the theme if you are interested in winning a $12 Gift Certificate from A Day for Daisies.
  • As always: All card submissions (with or without optional theme) will be eligible to earn a free paper each month and some extra digital goodies.
  • Guest Sponsor: A Day for Daisies (see info below).
  • Additional Sponsor: Décosse's Dynamite Doodles
  • Prize Info: 
    • From A Day for Daisies: A $12 Gift Certificate from A Day for Daisies for one random winner chosen from those who participate in the optional theme.
    • From Décosse's Dynamite Doodles: 
      • Prize 1: one free digital paper to EVERYONE who links up a minimum of two cards. The theme for these cards is optional
For some inspiration, here is the card I designed using the Tower of Gifts stamp and details on how I made the card.


Materials:
  • A Day for Daisies: Tower of Gifts stamp
  • White card stock for card base: 5.5"W x 11"H, scored at 4.25" mark
  • Holiday Decorations patterned paper from Décosse's Dynamite Doodles
  • Simon Says Stamp Stitched Rectangles Dies
  • Heidi Swapp Color Shine mist in gold
  • Copic Markers
  • Gold washi tape
  • Adhesive Tape Runner and Foam Adhesive
Directions:
  • Size the image of the Tower of Gifts and print on copic-friendly paper
  • Color the image using copic markers
  • Cut alternating layers of patterned paper and white card stock
  • Splatter the Color Shine on the white card stock
  • Adhere the layers together.

SPONSOR INFO:

As I mentioned above, this month's challenge is brought to you by our Guest Sponsor, A Day for Daisies. Here's some info about them:

  • A Day For Daisies provides themed categories of over 3000 digital illustrations and a fast growing line of new clear polymer stamp sets, including fairy tales and magical mermaids, cutie kids, vintage illustrations, sentiments and lovely designs for all occasions!
  • You can find them on their website, blog, Facebook or Etsy 

Our additional sponsor is Décosse's Dynamite Doodles.

http://decossesdynamitedoodles.blogspot.ca/

Now it's your turn!  Create a holiday card and be sure to add it to the 12 Months of Christmas Link Up Challenge blog!  Look forward to seeing your amazing designs!

Happy Card Making!


Monday, March 14, 2016

Blog Hop: Chibitronics and Xyron - Rainbow Season

Hi everyone,

I am so excited to be hopping along with the Chibitronics and Xyron design teams.  We were all asked to make projects incorporating Chibitronics circuit stickers and Xyron sticker machines.  This was SO MUCH FUN!

When I was in elementary school, I wrote my "career goals" in a booklet.  It said "When I grow up, I want to be...
1) an astronaut (I wasn't aware of my fear of G-Force and tight spaces, let alone poor eyesight)
2) a business guy (well, I'm not a guy, but yes I ended up getting my MBA)
3) a STICKER MAKER

I had the best sticker collection in town, or so I thought.  So today... 30 years later... I can finally say that I am a full-fledged sticker maker, thanks to the team at Xyron!

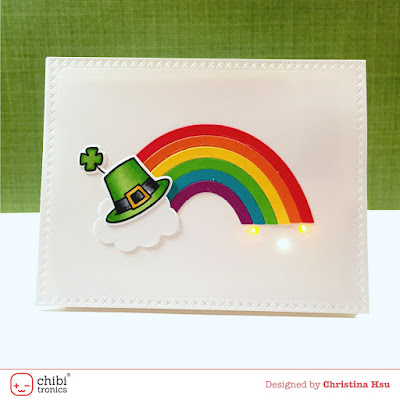
Here is my card in honor of St. Patrick's Day later this week.  I'm not Irish, but I am from the Boston area, so this a throw back to my childhood dreams and love for rainbows... with a bit of Irish thrown in.


Materials:

Directions:
  • Stamp the hat and clover on white cardstock using Memento Tuxedo Black Ink.  Color with Copic Markers.  Add Wink of Stella Clear Glitter Pen for added sparkle.  Die cut with coordinating dies.
  • Die cut the rainbow from the different colors of card stock.
  • Die cut the cloud and the sew fancy frame.
  • Xyron Steps
    • Run the hat and clover through the Xyron 1.5" Sticker Maker to make stickers. Keep the images facing up when you run it through.
    • Using washi tape, gently adhere the layers of the rainbow in the correct order.  Run this rainbow through the Xyron 3" Sticker Maker.
  • Chibitronics Steps
    • Place the rainbow on the card front and mark where you want the lights of "gold" to shine through.  Use a 1/8" hole punch to punch out these holes.
    • Using the card with the punched holes as a guide, mark where the lights need to be placed on the card base.
    • Create a battery holder by folding a piece of paper in half.  Mark off the positive and negative sides for battery placement.
    • Line the lights with copper tape.  Add the stickers and battery.  Test to see if it lights up.
  • Adhere the rainbow, cloud and hat to the front of the card.  
  • Adhere the front of the card to the card base.
  • Tip: to turn off the lights, just slide a scrap piece of paper into the battery holder to "short" the circuit.
Enjoy and keep hopping along!


Saturday, March 12, 2016

JessicaLynnOriginal.com New Release: The Love of a Cat

Hi everyone,

I'm here with another new release for JessicaLynnOriginal.com called "The Love of a Cat."  I know, I know, you all know how much I "love" cats (being facetious) but I know there are plenty of cat lovers out there, my best friend from high school being one of them.  She has two cats and a dog in addition to her family.  It's a zoo over there -- haha.

Anyhow, here's the card I made with this new stamp set:


Materials:

  • JessicaLynnOriginal.com: The Love of a Cat stamp set
  • Mama Elephant: Sew Fancy dies
  • Lawn Fawn: Scalloped Rectangle dies
  • Sizzix: Circle Dies
  • My Mind's Eye Patterned Paper: Now and Then
  • Copic Markers
  • Colored Pencils
  • Ribbon
Directions:
  • Die cut the windows from the patterned paper using your dies; add yellow ribbon.
  • Carefully measure where you want the cat and butterflies to sit using the die-cut window piece as a guide
  • Stamp the butterflies and cat.  Color with colored pencils and/or Copic markers
  • Using foam adhesive, adhere the die cut window piece on top of the stamps piece.
  • Attached to a folded card.
Here's a close-up of the card too:


Happy weekend!