Sunday, December 25, 2016

Merry Christmas! Full 2016 "25 Cards in 25 Days" Recap

Hi everyone!

Happy Holidays and Merry Christmas!  I hope you are all enjoying this holiday season and spending time with those who matter most.  I am very grateful and lucky to be surrounded by family and friends this holiday season and plan to cherish each day.

If you've been following my blog for the past few years, you know that I typically do a Countdown to Christmas "25 Cards in 25 Days" holiday card series.  Well, this year is no different... except for the fact that I decided to bring the series to my Bubblegum Paper YouTube channel instead of posting on my blog each day.  I know many of you subscribe to my channel and follow me there, so I hope you've had a chance to see some of the cards from the series this year.  However, since the original series launched here on my blog, I felt it was necessary to recap all the cards in one GIANT blog post... so here we go!

You can find the link to the full playlist of all 25 videos on YouTube here.

Note: for materials used and directions for each card, please watch the corresponding videos on YouTube by clicking on the images.

Card #1 | Mama Elephant: I kicked off the series with two new products from Mama Elephant: Pix's Happy Holiday and Wooly Winter stamp sets.  These proved to be very popular stamp sets throughout the series.

 Card #1 | Mama Elephant
Card #1 | Mama Elephant

Card #2 | Lawn Fawn: I then headed "Home for the Holidays" with Lawn Fawn.  I didn't really go home... in fact, I haven't been home all year.  This is probably the first calendar year in my life that I haven't been back home (due to health reasons).  Luckily, my family was able to come to California.

Card #2 | Lawn Fawn
Card #3 | Lawn Fawn: This day happened to be my aunt's birthday, so I combined the holiday cards with a "Season's Tweetings" message to wish her a happy birthday.

Card #3 | Lawn Fawn
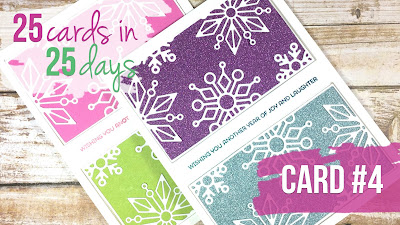
Card #4 | Simon Says Stamp: Occasionally a sketch out an idea and then it takes a turn or gets "improvised" during the creation process.  That's what happened in Day 4, so I ended up with not one, but two cards.

Card #4 | Simon Says Stamp
Card #5 | Avery Elle: Once again, reindeer seemed to be popular throughout the series. I incorporated reindeer from various stamp companies, this first of which was Avery Elle and their North Pole Pals stamp set.

Card #5 | Avery Elle
Card #6 | Mama Elephant: Feliz Navidad! This card contains another one of my random stories.  My friends and I love singing Feliz Navidad whenever we hear it on the radio.

Card #6 | Mama Elephant
Card #7 | Simon Says Stamp + Mama Elephant: This was one of my more elaborate card creations because it was a POP-UP card!  My favorite Lunar Animals stamps from Mama Elephant made their holiday debut in this fun pop-up card dedicated to my aunt and uncle who were celebrating their birthdays.  Yes, this too was another "story" card.

Card #7 | Simon Says Stamp + Mama Elephant
Card #8 | Mama Elephant: This card started with a simple sketch and ended up becoming one of my favorites of the series.  Perhaps it's because I absolutely love the Pix bunny character from Mama Elephant... and pink and purple never cease to amaze me.

Card #8 | Mama Elephant
Card #9 | Lawn Fawn + Avery Elle: I changed it up a bit and made three Christmas tags using a combination of stamps from Lawn Fawn and Avery Elle.  The scripty Merriest sentiments from Avery Elle are so cool!

Card #9 | Lawn Fawn + Avery Elle
Card #10 | Lawn Fawn + Avery Elle: This was a new technique I decided try with the Avery Elle Santa Stamps and Dies from their "North Pole Pals" stamp set.  I used the coordinating die to make a window.  This card, was the first of many that could be considered "quick and easy" for making multiple sets.

Card #10 | Lawn Fawn + Avery Elle
Card #11 | Taylored Expressions: I went with an elegant holiday card incorporating the Taylored Expressions Shade Tree cutting plate with some blue and silver glitter paper.  I was channeling my inner Frozen theme that day.

Card #11 | Taylored Expressions
Card #12 | Lawn Fawn: This was the first appearance of the Lawn Fawn Penguins.  I'm surprised I didn't use them more often, but they were fun to color nonetheless.  I did manage to use the "Snow Cool" stamp set a few times in the series.

Card #12 | Lawn Fawn 
Card #13 | Concord & 9th + Simon Says Stamp: This card was one of the cards I sketched early in the series because I was sooooo excited to figure out how the Take a Bough dies from Concord & 9th worked.  It took my a little longer than I expected to make the card, but it was so much fun and now I can replicate the card in record time.

Card #13 | Concord & 9th + Simon Says Stamp
Card #14 | Mama Elephant + Doodlebug Design: My Simon Says Stamp December 2016 card kit came earlier in December, so I decided to crack it open for this card.  Once I saw the super cute Doodlebug Design products and Mailbox Doodle Pops, I knew I had to combine it with the Mama Elephant "Incoming Mail" stamp set.

Card #14 | Mama Elephant + Doodlebug Design
Card #15 | Lawn Fawn: I mixed it up again and instead of creating a standard A2 greeting card, I made two different mini gift cards with matching envelopes. I used the Oh Snap and Cheery Christmas stamp sets from Lawn Fawn along with the gift card envelope die from The Stamps of Life.

Card #15 | Lawn Fawn
Card #16 | Simon Says Stamp: I started falling behind schedule with work and everything, so I needed a quick and easy card to help me close the gap.  The deco tree dies from Simon Says Stamp were perfect for this occasion.

Card #16 | Simon Says Stamp
Card #17 | Mama Elephant: This card also served as a quick and easy card and helped me close the gap on my backlog of cards, but it also served as a mini teaser to Card #18 which also featured the Reindeer Games stamp set from Mama Elephant.

Card #17 | Mama Elephant
Card #18 | Mama Elephant + Lawn Fawn: This was an interactive SPINNING card.  I sketched the original idea for this card back in October when the Mama Elephant Wooly Winter stamp set was first released.  I knew I wanted to incorporate the little wanna-be-reindeer lamb with the reindeer from last year's Reindeer Games stamp set.  The result: this spinning card that was super fun to make.  I laugh every time I see the little lamb's red nose!

Card #18 | Mama Elephant + Lawn Fawn
Card #19 | Mama Elephant + Lawn Fawn: In case you haven't noticed, I tend to use a lot of Mama Elephant and Lawn Fawn products.  They go great together and their little stamp characters are always so cute.  For this card, I use the Mama Elephant Playful Pups stamp set and paired it with some holiday accessories from Lawn Fawn.

Card #19 | Mama Elephant + Lawn Fawn 
Card #20 | Lawn Fawn: It's hard to believe that it took me a full 20 cards to make my first shaker card of the series!! There were so many times before Card #20 that I said to myself, "oh, I can turn this into a shaker card."  Given the amount of foam adhesive I used in each card, multiple shaker cards was definitely possible.

Card #20 | Lawn Fawn
Card #21 | Simon Says Stamp: I turned to the Simon Says Stamp card kit once again to make this super easy no die-cutting card.  Stamp masking is a technique I typically use whenever I don't have coordinating dies for a given stamp set.  That's why you see me using this with a lot of Simon Says Stamp stamp sets because they come in a card kit, typically without coordinating dies.

Card #21 | Simon Says Stamp
Card #22 | Paper Smooches: Once again I was falling behind in my video posts, so I needed a quick and easy card to help me get back on track.  These stockings dies from Paper Smooches came to the rescue!

Card #22 | Paper Smooches
Card #23 | Mama Elephant: For my last few cards, I had to make them ahead of time because I was heading out of town but I wanted to have some kind of story or theme with each one.  So I figured I would make one that represented me and my boyfriend, one for my family and one with Bubblegum.  This is the card that incorporates me (rabbit) and Rob (mouse) and it also includes two of my very favorite stamp sets from Mama Elephant.

Card #23 | Mama Elephant
Card #24 | WPlus9 + Mama Elephant: This card is a greeting from my family to yours.  I used the WPlus9 garden buddies (one of my few stamps sets with people) and incorporated some snapshots of my family.

Card #24 | WPlus9 + Mama Elephant
Card #25 | My Favorite Things + Mama Elephant: For my final card, I am once again incorporating some kind of Bubblegum theme.  This year, I chose the Gumball Machine die from My Favorite Things.  This card is dedicated to all of you... my blog and YouTube subscribers.  Thank you for your support and feedback throughout my crafting journey.  I appreciate it sooooo much!

Card #25 | My Favorite Things + Mama Elephant
So, I wasn't kidding when I said "Giant Recap" right?  That completes 25 Cards in 25 Days for 2016.  I wish you all the very best in the coming New Year!  See you in 2017!

Best,
Christina

Wednesday, November 23, 2016

Fall Frugal Fun: Thanksgiving Favors, Place Cards and More!

Hi everyone,

It's hard to believe the holidays are here!  The local radio station just started playing holiday music 24/7... that's when you know Thanksgiving is right around the corner.  And you know what that means: FOOD, FAMILY and FUN!

When I was younger, our family would typically drive down to New Jersey and spend Thanksgiving at my aunt's house.  We would have an amazing weekend of eating.  Thanksgiving dinner typically consisted of half "American" and half "Chinese" food.  Occasionally we would experiment with different food discoveries.  One year, I went back and wanted to show of my sushi making skills and tried to make sushi for the whole family.  Only, I misread the recipe and added a cup of vinegar to the rice instead of a tablespoon. As a result we had a lot of vinegar flavored rice to use up that weekend!

After Thanksgiving Day, we would get up bright and early and head to the outlet malls for some fun shopping excursions, fighting the insane crowds and cars.  We set out in multiple cars, had different meeting times and locations and went off on our own to shop.  I'm always impressed that we were able to make this happen and not get lost. After all, this was the era before we all had cell phones!

But the holiday season doesn't necessarily mean we need to spend a ton of money.  I'm here today with a few easy DIY Thanksgiving decorating ideas that are fun for the whole family to make. Consider these projects "frugal fun" ways to use up any scraps you have lying around.  And, if you're interested in tips to help you stay on budget this holiday season, check out these free financial tools from Personal Capital.

First up: Party Favor Boxes.  You can fill them with candy and other treats!

I used the Mama Elephant Gable Boxes and one sheet of 12x12 patterned paper to make these two party favor boxes.  It's so easy and fun.  I decorated the front with an embossed "thanks" from the Simon Says Stamp Thankful Hearts stamp set and paired that with some scrap patterned paper.

Next, I have place cards.  These are so easy to make!

I used the same patterned paper as the paper I used for the gable boxes, cut them into 3.5"W x 4.25"H rectangles and folded them in half.  I used the same rectangle die from the Gable Boxes and cut out scraps of orange and green paper.  I stamped "Mama" and "Baba" in gold ink using the Mama Elephant Calli Letters stamp set.  You could easily just write the names by hand.  I finished them with decorative leaf stickers from my ever-growing sticker collection.  This pack of 18 clear glitter stickers was only $1 from Hobby Lobby!

Lastly, I made a few napkin rings with my remaining scrap paper.


I punched two circles from the same scrap paper, added the stickers and wrapped a ring around the napkins with the leafy patterned paper I used for the favor boxes and the place cards.  

In addition to these projects, there are so many other DIY projects you can make for the holidays.  Banners, thankful/gratitude cards, food labels for parties... the key is to have fun and get the whole family involved.  It's all about the fun and you don't have to spend a lot of money.  Just search the house for different scraps you have lying around and make something creative!

Happy Thanksgiving!  Gobble Gobble!

Monday, November 14, 2016

Card Series: One Kit - Five Cards | Doodlebug Design | Under the Sea

Hi everyone,

Given all the recent events happening IRL (in real life), I've turned to my happy place... card making. I also haven't posted a video on my YouTube channel in a while, so this weekend, I posted a series of card videos where I use one kit and make five different cards.

The original inspiration for this project came a few weeks ago as I was preparing for my much needed vacation to Hawaii.  I was so excited and thought it would be fun to create a bunch of cards for each day while I was in Hawaii.  Well, guess what?  I didn't make any videos or do much of anything while I was on vacation.  In the days leading to vacation I was busy with work and packing and just getting everything in order.  Do you ever clean the house before you leave for vacation?  For some reason, I like do tidy up before I go... or at least try to tidy.  I had grand plans of writing blog posts and editing videos while on my trip... but guess what?  I didn't.  I spent most of my vacation eating yummy food, relaxing, spending time with fun people and experiencing once in a lifetime adventures, like watching lava flow straight into the ocean at 5am.

Okay, back to this card series.  With the ocean, beach, Hawaii them in mind, I decided to use this super cute Doodlebug Design Under the Sea Collection Essentials Kit.  If you're not familiar with Doodlebug Design, they make the happiest, brightest, cutest designs, characters and patterns.  Everything coordinates.  Everything is just ever-so-cheerful!  This kit is no different!

Here are images of the five cards I created (well, 6 really) and a BONUS plan with me video.  I also posted tutorial process videos on my Bubblegum Paper YouTube Channel.  You can see the entire playlist here or click on each image below to go directly to the corresponding process video on YouTube.

Card 1: Hugs - Click to see this card on YouTube
Card 2: Peace - Click to see this card on YouTube
Card 3: Aloha - Click to see this card on YouTube
Card 4: Love - Click to see this card on YouTube
Card 5: Happiness - Click to see this card on YouTube
BONUS: Plan with Me Planner Video - Click to see this card on YouTube

Hope you enjoy watching the videos and I'll be back soon with more projects!

Christina

Monday, November 7, 2016

Fairy Wishes | Collab: Chibitronics + Lawn Fawn

Hello everyone!

I has been a long time since I've posted cards... but rest assured there are many cards (and videos) coming your way shortly.  Today, I'm posting another fun design team collabortation card.  The Chibitronics design team paired up with Lawn Fawn once again to bring you some festive holiday cards.  I used the Frosty Fairy Friends stamps and dies to make this card.


Materials:

  • Chibitronics: Chibi Lights LED Circuit Stickers starter kit*
  • Lawn Fawn: Frosty Fairy Friends stamps and dies*
  • Lawn Fawn: Cross Stitched Squares dies (large and small)
  • Lawn Fawn: Stitched Hillside borders dies
  • Distress Ink: Salty Ocean, Chipped Sapphire, Seedless Preserves
  • Copic Markers
  • Foam Adhesive
  • Adhesive Tape Runner
  • White card stock
    • 4"x4" square for the sky background
    • 4"x8" card base
    • extra card stock for frame and hills
Directions:
  • Stamp all the images, color with copic markers, cut out using coordinating dies
  • Die cut stitched hillside borders to make two hills
  • Die cut the cross-stitched frame
  • Use distress inks to blend the sky
  • Place all elements on the card to find the spot where the light sticker should go.
  • Punch a hole in the treehouse window and mark the spot on the sky card with a pencil
  • Punch a hole in the sky card.
  • Place sky card over the card base and mark the spot with a pencil.  This is where the light sticker goes.
  • Using copper tape, lay down a positive and negative lead to the battery holder and place sticker on top of the copper tape right over your pencil mark.  Place battery in battery holder.
  • Add foam adhesive in two layers around the entire card base and three sides of the battery holder to keep the battery from slipping out. 
  • Attach the sky background.
  • Layer the scene on top using foam adhesive and adhesive tape runner.
  • To turn off the battery, insert a scrap piece of card stock in between the battery and the copper tape.  When the recipient pulls the tab, the card will light up.


Note: the products noted with an asterisk (*) were generously provided by the sponsors.  All other products I purchased on my own.  All opinions expressed are my own. 

Monday, October 3, 2016

A Haunted Light-Up Card | Collab: Avery Elle + Chibitronics

Hi everyone,

I'm so excited to be participating in another fun Chibitronics collaboration.  Today we have teamed up with the Avery Elle design team to bring you some super fun projects.

I took the new Avery Elle chalet stamp set which features some really fun "build your own" Christmas-themed chalet, but I turned it into a spooky haunted house card for Halloween.  You can watch my YouTube video to see how I masked out parts of the stamp set to make it more Halloween-themed.  I also used the Avery Elle Merriest stamps for my sentiments.  I love these sentiments and I am pretty sure you'll be seeing a lot more of these in future projects.  I finished it off with their Wonky Stitches dies.

To make the card light-up, I started with the Chibitronics LED circuit sticker starter kit and made a parallel circuit, but instead of the starter kit lights (red, yellow, blue), I used the Tropical Lights add-ons to add more color.  I love the pinkish purple, green and orange lights.  They fit perfectly with any Halloween (or Mardi Gras) themed projects!

Here is the finished card:

A haunted light-up card featuring Avery Elle and Chibitronics products.
Watch those light glow - how spooky!


Materials:


Directions:

Click the image above to see how I made this card on YouTube.

For other design team projects visit their blogs here:


About Avery Elle:

  • Avery Elle is a small corporation located in Southern California.  They launched their first set of whimsical stamps in June 2012 and have now expanded into stamps, dies, and color coordinating pigment ink pads, patterned paper pads, twine and A2 top folding note cards. Avery Elle stamps, dies and paper are all proudly made right here in the USA.  
  • Don't forget to check out their shop and design blog, or you can also follow them on social media: Facebook, Instagram, Twitter and YouTube.

About Chibitronics:

  • Learn more about Chibitronics and check out more tutorials on their website. You can find the products used here in their shop.  You can also follow them on social media: Facebook and Twitter.

Note: the products noted with an asterisk (*) were generously provided by the sponsors.  All other products I purchased on my own.  All opinions expressed are my own.

Thursday, August 25, 2016

Collab: Chibitronics + My Favorite Things


Hi everyone,

I am so excited to participate in another fun collaboration.  Today the Chibitronics and My Favorite Things have teamed up to bring you some fun projects.  Today I'm sharing my project with all of you! I wanted to make a super interactive card.  My Favorite Things has these awesome stitched interactive windows.  Basically, you die cut the three windows and you let the recipient lift them up to see what's inside.  I already lifted them up in this card in order to take a picture to share with all of you.  It's kind of like an advent calendar.  Ooooh!  That's an idea I'm going to have to save for my Christmas card series... note to self!

In addition to the interactive windows, I incorporated the Chibitronics LED circuit stickers underneath each of the panels.  So the flowers and balloons light up.  Here's what the card looks like:


Materials:
Directions:

  • Please watch my YouTube video here to see me make this card from start-to-finish.  You can also click on the image below.
Click the image to watch me make this card on YouTube


More My Favorite Things and Chibitronics Creative Projects:

If you want to see more projects featuring My Favorite Things + Chibitronics, check out the posts on the Chibitronics blog here and the My Favorite Things blog for each day of the collaboration here: Day 1, Day 2, Day 3 and Day 4.


About Chibitronics:

  • To learn more about Chibitronics, you can visit their website and see even more ways to use these exciting LED lights.  Some of my older card projects are posted on their craft page.  You can try out their tutorials and more advance techniques. Interested in trying it out for yourself?  Check out their shop too!

About My Favorite Things:


More Chibitronics Inspiration from Bubblegum Paper:
Have an awesome day!

Christina

A note about the products used: Both the Chibitronics starter kit and the My Favorite Things products were sent to me from both companies free of charge. I was given a gift certificate to select which products to showcase, so I definitely like everything I used in this project and would definitely use it again.  Thank you again for checking out this card.  

Sunday, August 21, 2016

Another Birthday | Another Year | Happy Birthday to Me | Lawn Fawn

Hi everyone,

I love celebrating birthdays, and celebrating my own is no different. Yippee!  I know some people worry about getting older every year and I must say that my body has definitely challenged me this past year... but all in all, I still feel young, sound young and try to stay young at heart.  It's all a mindset, right?

When I reflect back on this past year, although it was filled with new challenges, it was also filled with some extremely happy and special moments.  I am grateful to the many friends who have called, checked in, spent time, visited and helped me through each stage. I'm grateful for my boyfriend and his family for their care and support. I'm also extremely lucky to have the most supportive, cohesive, caring, loving family.  From my parents who call every day to check on me and keep me on the right track to my brother & cousins who help me prioritize and focus on getting stronger and healthier to my aunts and uncles who have visited and helped out pre and post-surgery -- I am one very lucky girl and extremely blessed to have all these amazing people in my life. Thank you all!

For my birthday, I typically head to Disneyland (fun for kids of all ages) or Hawaii (so tropical and relaxing).  However, this year I had to take it easy.  So... I made myself a snow globe card inspired by Disneyland and Hawaii.

Materials:

  • Lawn Fawn: Life is Good
  • Lawn Fawn: Ready, Set, Snow Add-on Shaker Dies and Sentiments
  • Lawn Fawn: Stripey Backdrop Dies
  • Pretty Pink Posh: Clear Sequins
  • Copic Markers
  • Distress Ink
  • Versamark Ink
  • Memento Tuxedo Black Ink
  • Foam Adhesive
  • Adhesive Tape Runner
Directions:
  • Please head over to my YouTube channel to watch me make this card from start-to-finish.  You can click on the image below.
Click the image above to watch me make this card on YouTube

Looking forward to a happy, healthy, carefree, stress free, super fun year ahead and spending more time with my amazing family and friends and all of you, my Bubblegum Paper supporters!

Love,
Christina

Saturday, August 20, 2016

Happy Birthday, Ge! | Mama Elephant & The Stamps of Life

Hi friends,

It's my older brother's birthday today! Happy Birthday, Ge! He doesn't enjoy celebrating his birthday as much as I do, but then again, I love celebrating ALL birthdays!  I made this card featuring the two of us on a rooftop with a pig balloon.  He was born in the year of the Pig.  When I was a kid, I wanted to adventure onto the top of our roof... and become the ultimate Fiddler on the Roof.  My brother helped me achieve that goal.  He figured out a way to climb out the bathroom window.  We had two levels of roofs... a shorter one and a taller one.  I asked him to give me a boost to the top roof... but I don't think it was very successful because I was laughing the whole time.  We ended up staying out there for 5-10 minutes and came back in.  So sneaky!

I didn't have a rooftop stamp or die cut that was wide enough for a card, so I decided to use a scallop border die from The Stamps of Life to make my own roof.  I paired this with the Carried Away and Lunar Animals stamps from Mama Elephant.  Here's the card:

Materials:

Directions:
  • Please watch my YouTube video here to see how I made this card from start-to-finish.
Click on this image to watch my video on YouTube
Enjoy and Happy Birthday, Ge!


Tuesday, August 16, 2016

Happy Birthday Jiu Ma | Embossing & Watercoloring | Concord & 9th

Hello everyone,

Today's card is a special birthday card for my Aunt Nancy.  I called her Jiu Ma.  She's extremely talented and very generous. I was looking at my old photos the other day and realized many of my favorite childhood outfits were gifts from Jiu Ma.  She was always giving us thoughtful gifts, even if I wasn't old enough to appreciate them.  I was born in the Year of the Rabbit.  I remember being 5 or 6 years old when she and my uncle drove up to New England to visit us. I was taking an afternoon nap and when I woke up there was a stuffed rabbit hand puppet next to me.  Jiu Ma had the puppet over her hand and gently said "Christina, wake up, wake up!"  I not only woke up, but I freaked out and cried!!  I thought there was a real rabbit in my bed.  That puppet scared me and I wasn't able to look at it for years!  I think the rabbit is still sitting in my closet somewhere, but I'd probably still be scared if I saw it today.  Luckily, my time spent with her in my later years are much happier and we're always laughing and smiling.  That why this stamp set from Concord & 9th is perfect for today's card.

I'm using the Barnwood Background and Love You. Mean It. stamp sets from Concord & 9th.  I combined heat embossing and watercoloring in this card.

Full Card
Close-Up Image

Materials:
Directions:
Click here to watch me make this card from start-to-finish on YouTube

Happy Birthday, Jiu Ma!

Love,
Christina